banner


How To Clean Iphone 7 Plus Ear Speaker

Introduction

The iPhone 7 Plus earpiece speaker as well performs double duty as a loudspeaker, providing stereo audio. If your earpiece speaker is acting up, follow this guide to remove and supervene upon it.

  1. Before you begin, discharge your iPhone battery below 25%. A charged lithium-ion battery can catch fire and/or explode if accidentally punctured.

    • Before y'all brainstorm, discharge your iPhone battery below 25%. A charged lithium-ion battery can catch fire and/or explode if accidentally punctured.

    • Power off your iPhone earlier offset disassembly.

    • Remove the two 3.iv mm pentalobe screws at the lesser edge of the iPhone.

    • Opening the iPhone's display volition compromise its waterproof seals. Accept replacement seals set before you keep by this step, or have care to avert liquid exposure if y'all reassemble your iPhone without replacing the seals.

  2. Heating the lower edge of the iPhone will help soften the adhesive securing the display, making it easier to open.

    • Heating the lower border of the iPhone will help soften the adhesive securing the brandish, making it easier to open.

    • Apply a hairdryer or set up an iOpener and apply it to the lower edge of the iPhone for about a minute in order to soften upward the adhesive underneath.

  3. Apply a suction cup to the lower half  of the front panel, just above the home button. Be sure the suction cup does not overlap with the home button, as this will prevent a seal from forming between the suction cup and front glass.

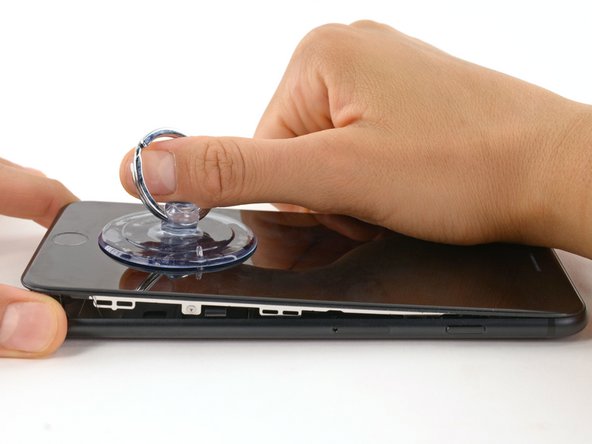
    • Apply a suction cup to the lower half of the front panel, just to a higher place the home button.

    • Exist sure the suction loving cup does not overlap with the abode button, as this volition prevent a seal from forming betwixt the suction cup and front glass.

    • If your brandish is desperately croaky, covering it with a layer of clear packing tape may permit the suction cup to adhere. Alternatively, very potent record may be used instead of the suction loving cup. If all else fails, you can superglue the suction loving cup to the cleaved screen.

  4. Pull up on the suction cup with firm, constant pressure to create a slight gap between the front panel and rear case. Insert the flat end of a spudger into the gap. The watertight adhesive holding the display in place is very strong; creating this initial gap takes a significant amount of force. If you're having a hard time opening a gap, rock the screen up and down to weaken the adhesive until you can fit a spudger inside.

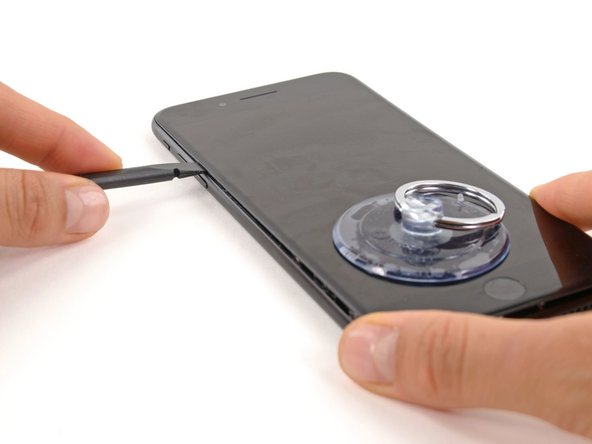
    • Pull upwardly on the suction cup with business firm, abiding pressure to create a slight gap between the front panel and rear case.

    • Insert the apartment finish of a spudger into the gap.

    • The watertight adhesive holding the display in identify is very strong; creating this initial gap takes a significant amount of force. If yous're having a hard time opening a gap, stone the screen upwards and downwardly to weaken the agglutinative until you can fit a spudger within.

    • While pulling upwardly on the suction cup, twist the spudger to widen the opening between the screen and rear case.

  5. Insert the flat end of the spudger between the front panel and the rear case at the lower left edge of the iPhone. Slide the spudger up the left edge of the phone starting at the lower edge and moving towards the volume control buttons and silent switch, breaking up the adhesive holding the display in place. Do not try to pry the top edge of the display away from the rear case, as it is held in place by plastic clips that may break.

    • Insert the apartment end of the spudger between the front console and the rear instance at the lower left border of the iPhone.

    • Slide the spudger up the left edge of the phone starting at the lower edge and moving towards the book control buttons and silent switch, breaking upward the adhesive holding the display in identify.

    • Do non attempt to pry the top edge of the display abroad from the rear case, as it is held in place past plastic clips that may pause.

  6. Remove the spudger from the left side of the phone and insert the flat end into the bottom right corner. Slide the spudger up the right edge of the phone to the top corner, breaking up the adhesive holding the display in place.

    • Remove the spudger from the left side of the phone and insert the flat terminate into the bottom right corner.

    • Slide the spudger up the right edge of the phone to the top corner, breaking up the adhesive holding the display in place.

  7. Pull up on the suction cup to lift up the display and open the iPhone. Do not raise the display more than 10º as there are delicate ribbon cables along the right edge of the device connecting the display to the logic board.

    • Pull up on the suction cup to lift up the display and open up the iPhone.

    • Exercise not raise the display more 10º as at that place are delicate ribbon cables along the right edge of the device connecting the brandish to the logic board.

  8. Pull up on the small nub on the suction cup to remove it from the front panel. Pull up on the small nub on the suction cup to remove it from the front panel.

    • Pull up on the small-scale nub on the suction cup to remove it from the front panel.

  9. Slide an opening pick underneath the display along the top edge of the phone to loosen the last of the adhesive. Slide an opening pick underneath the display along the top edge of the phone to loosen the last of the adhesive.

    • Slide an opening pick underneath the display along the meridian edge of the phone to loosen the last of the adhesive.

  10. Pull the display assembly slightly away from the top edge of the phone to disengage the clips holding it to the rear case. Open the iPhone by swinging the display up from the left side, like the back cover of a book. Don't try to fully separate the display yet, as several fragile ribbon cables still connect it to the iPhone's logic board.

    • Pull the display assembly slightly away from the summit edge of the telephone to disengage the clips holding it to the rear case.

    • Open the iPhone by swinging the display up from the left side, like the dorsum cover of a volume.

    • Don't endeavor to fully separate the brandish withal, as several delicate ribbon cables still connect it to the iPhone's logic lath.

  11. Remove the following four tri-point Y000 screws securing the lower display cable bracket to the logic board:

    • Remove the following four tri-point Y000 screws securing the lower display cablevision subclass to the logic board:

    • Iii 1.2 mm screws

    • One ii.six mm screw

  12. Remove the lower display cable bracket. Remove the lower display cable bracket.

    • Remove the lower brandish cable bracket.

  13. Use the point of a spudger to lift the battery connector out of its socket on the logic board. Bend the connector cable up slightly to prevent it from making contact with the socket and providing power to  the phone. Bend the connector cable up slightly to prevent it from making contact with the socket and providing power to  the phone.

    • Use the point of a spudger to elevator the bombardment connector out of its socket on the logic board.

    • Bend the connector cablevision up slightly to prevent it from making contact with the socket and providing power to the phone.

  14. Make sure the battery is disconnected before you disconnect or reconnect the cables in this step. Use the flat end of a spudger or a fingernail to disconnect the two lower display connectors by prying them straight up from their sockets on the logic board. To re-attach press connectors, press down on one end until it clicks into place, then repeat on the other end. Do not press down on the middle. If the connector is even slightly misaligned, the connector can bend, causing permanent damage.

    • Make sure the battery is disconnected earlier you disconnect or reconnect the cables in this pace.

    • Use the flat finish of a spudger or a fingernail to disconnect the two lower brandish connectors by prying them directly upwards from their sockets on the logic lath.

    • To re-adhere press connectors, printing down on one stop until information technology clicks into place, then echo on the other end. Do not printing downward on the middle. If the connector is even slightly misaligned, the connector tin bend, causing permanent impairment.

    • If you accept a blank screen, white lines on the brandish, or partial or consummate lack of touch response after reassembling your telephone, endeavor disconnecting and carefully reconnecting both of these cables and brand certain they are fully seated.

  15. Remove the three tri-point Y000 screws securing the bracket over the front panel sensor assembly connector: One 1.3 mm screw Two 1.0 mm screws

    • Remove the three tri-indicate Y000 screws securing the bracket over the front console sensor assembly connector:

    • 1 1.3 mm screw

    • Two 1.0 mm screws

    • Remove the bracket.

  16. Disconnect the front panel sensor assembly connector from its socket on the logic board. This press connector should also be reconnected one end at a time to minimize the risk of bending.

    • Disconnect the front panel sensor assembly connector from its socket on the logic board.

    • This printing connector should also be reconnected 1 cease at a fourth dimension to minimize the risk of bending.

  17. Remove the display assembly.

    • Remove the display assembly.

    • During reassembly, suspension here if you wish to replace the adhesive around the edges of the display.

  18. Remove the five Phillips screws securing the earpiece speaker bracket:

    • Remove the five Phillips screws securing the earpiece speaker subclass:

    • Two 1.8 mm screws

    • I two.three mm screw

    • I 2.4 mm screw

    • Ane 2.8 mm screw

  19. Remove the earpiece speaker bracket.

    • Remove the earpiece speaker bracket.

  20. Use the flat end of a spudger to lift the front-facing camera from its housing. Gently bend the camera ribbon cable to the side to clear the way to the earpiece speaker underneath. Gently bend the camera ribbon cable to the side to clear the way to the earpiece speaker underneath.

    • Use the flat terminate of a spudger to lift the front-facing camera from its housing.

    • Gently bend the camera ribbon cable to the side to clear the way to the earpiece speaker underneath.

  21. Remove the earpiece speaker.

    • Remove the earpiece speaker.

    • Don't bear on the four jump contacts with your fingers—your skin oils may cause a malfunction. If accidentally touched, clean the contacts gently with isopropyl alcohol (90% or higher).

Conclusion

Compare your new replacement part to the original part—you may need to transfer remaining components or remove adhesive backings from the new office before installing.

To reassemble your device, follow the above steps in reverse guild.

Take your eastward-waste to an R2 or e-Stewards certified recycler.

Repair didn't go every bit planned? Try some basic troubleshooting, or search our Answers forum for help.

Team

Embed this guide

Choose a size and copy the code below to embed this guide as a small widget on your site / forum.

Preview

Source: https://www.ifixit.com/Guide/iPhone+7+Plus+Earpiece+Speaker+Replacement/95614

Posted by: feltonandesch.blogspot.com

0 Response to "How To Clean Iphone 7 Plus Ear Speaker"

Post a Comment

Iklan Atas Artikel

Iklan Tengah Artikel 1

Iklan Tengah Artikel 2

Iklan Bawah Artikel